Windows can pose a decorating dilemma. Most of the day, you will want your windown unobstructed so that plenty of light can enter a room. But at night you would'nt like to see those unattractive window frame. Light is an essential decorating element. There's nothing better than natural light. When planning your room lighting, you should understand the different possibilities and how to achieve them, either naturally or artificially. The window placement should be considered when deciding on the type of curtain, shade, or how other window treatment could look best.
When you need to brighten up room or a hallway, a touch of yellow does a lot. The use of yellow to paint the interior of a closet gives you a welcome surprise every time you open your closet door. A pale shade of yellow looks very nice in a kitchen or baby's room. If your wallpaper has some yellow accents, consider using yellow on the trimmings of your window, door, and wall. Explore other areas in your home to find where you can add a yellow touch. You'll be amazed at how refreshing and delightful the result will be.
The level tool used in carpentry is typically made of wood, aluminum, or magnesium,
and is rectangular in shape, from 9 to 24 inches long. It may typically have one or more true surfaces
having a glass vial in the center of each surface. The glass vial right
in the center of a horizontal surface and parallel with it is used in
leveling; a glass vial in the end of a level, perpendicular to the true
surface, is used to check the plumb or vertical trueness.
To check whether a surface is level or plumb, put the level tool on the
surface to be leveled or plumbed, while holding the level with the hand.
When the position of the bubble isn’t in the center of the vial, the
surface is not level or plumb. The bubble always moves toward the higher
side...READ MORE>>>
Here are some tips on effectively cutting wood using a hand saw.
A circular cut on wood is typically created by boring a hole using a brace and bit or a drill, then expanding it using a compass or a coping saw or a saber saw. If much of this work must be done, like in cutting a straight cut through floors, it is a good idea to round the end of a crosscut saw, extending the teeth so they form a semicircle. This can be used to cut directly on the floor without drilling. A similar result can be obtained by bolting half a blade of a circular saw to the base of a steel strip or an old saw.
When the saw cut would be of limited depth, create a fence from two thin strips of wood a bit longer than the saw blade...READ MORE>>>
There is a seven-step sequence to weaving a cane seat. You
first lace the cane vertically, from rear seat rail to front seat rail. Second,
lace the cane horizontally. Third, weave the cane diagonally. Fourth, put down
a second vertical layer. Fifth, weave a second horizontal layer. Sixth, weave a
second diagonal layer. Seventh, lace binder cane over the holes. Tie off cane
ends beneath the rails as you go.
Before you begin recaning your chair, read the preparation instructions provided on the link below:
Step one: begin vertical strands of cane from center hole in
back rail to center hole in front rail. Count the holes to be sure. If there's
an even number of holes, start with a hole closest to the center. Push around 4
inches of cane through back center hole, and hold it using a wooden peg. Pull
the cane across and down through the front center hole, making sure the smooth
side of the cane faces up. Bring the end of the cane on the underside of the front
rail and up through the next hole. Then go across seat to the next hole in the
back rail and down through. Then over to the next hole, up through it, across
to the front rail, and down through the next hole there. Keep on lacing the
cane this way until half of the seat is covered. Then cover the other half the
same way. Never pull the cane too tight; it would shrink as it dries. Knot the
ends.
Step two: Lace the horizontal strands across from side rail
to side rail in the same manner. These strands lie on top of the vertical ones.
Step three: Weave the first diagonal strands, starting at
the right front corner, over horizontal strands and under vertical strands. To
maintain six-pointed star pattern, you may have to put two strands through the
same hole, due to the curvature of the side rails.
Step four: Lay a second course of vertical cane over the
work thus far, using the same holes as for the first course. This course isn't
woven in. Lay cane to the right of the original vertical strands.
Step five: Weave in a second course of horizontal strands,
using the same holes as the first course. These strands go below diagonal
course and first vertical course, and over second vertical course. Place them
to the rear of horizontal strands laid down in step two.
Step six: Weave in a second course of diagonal strands, this
time in the opposite direction from the first diagonal course. These weavers
always go under all horizontal and over all vertical strands, just the opposite
of the way in which diagonal strands were laid down in step three.
Step seven: Fasten the binder cane around the seat's
perimeter to cover the cane holes. Binder cane is ordinarily just cane that is
one size wider than the cane you use for weaving. Measure adequate length to go
around.
Push one end of the binder cane into the corner hole at the
right rear corner, and lay out the rest along the back edge of the cane. Choose
a long strand of weaving cane, and pull all but 4 inches through the hole next
to one where binder started out. Loop end of weaving cane around binder, and
pull it through the same hole, tying the binder down. Next, bring the long end
of the cane up through the next hole, over the binder, and back down through
the same hole. Keep on this with each hole until you have tied the binder down
the whole way around. Tuck the end of the binder into the same hole where you
started.
The marking gauge is designed to help you make accurate
lines parallel to the edge of a panel or board. A common wood gauge is about 8
inches long, with a scribing spur close to one end. A sliding head may be moved
through the body and clamped using a thumbscrew at any place. When choosing a
gauge, get one made from hardwood secured with a brass or metal head. A special
double-bar gauge with two spurs is designed for marking off a mortise. The
gauge is set once, and the spur on each side is used in turn to show the
mortise area.
For the job of boring holes on your woodwork project,
there's this wonderful tool called the brace and bit. When boring holes in
wood, a few turns would feed the bit into the wood without much pressure. To
drive screws, the pressure should be maintained. When working in corners or
other tight areas wherein a full turn of the crank is out of the question, a
ratchet mechanism is plied to ratchet the bit either to the right (to drive) or
to the left (to withdraw) just by turning the cam ring.
Holes are often bored at the wrong angle since the
woodworker may not be aware how uncomplicated it is to bore them perpendicular
to the pierced surface. The main problems that go with boring a hole are
getting it straight and not breaking rough the wood at the bottom of the hole.>>>READ MORE
Carpenters use different types of pencils: hard lead, common
lead,and the regular carpenter pencil. The most widely used type is the flat,
hard lead pencil -- 8 inches long.
Utilised in rough work, the pencil should be trimmed so that only 1/4 to
3/8 inch of lead protrudes from the wood sheath. In finished work, the pencil
must be trimmed so that 3/8 to 1/2 inch of lead is exposed and the lead tapered
to a long, flat point. During marking, the pencil should be angled away from
the guide so that the lead would mark near the edge of the guide. If the pencil
gets wet, the glue that holds it together may fail and render the pencil
useless.>>> READ MORE
When you anticipate doing any amount of mitring—that is,
sawing at an angle—a mitre box would be a big timesaver. Guides on the mitre
box can be conformed so that a backsaw will cut at whatever angle from 45 to 90
degrees to any desired depth. Care must be taken that the stock doesn't shift
while cutting, and that the saw doesn't either touch the front or pull out of
the rear guide. Matching pieces can be easily cut just by adjusting the length
rod. Frames from 4 to 12 sides can be cut by relating to the proper angle,
often pointed on the mitre box itself. In sawing, always begin on the outside
of a mark. A crosscut saw has a kerf of about 1/16 inch, and a rough edge would
require some added smoothing.
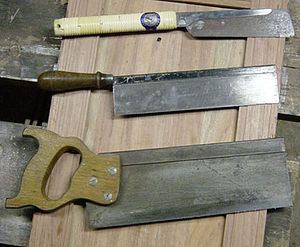
The backsaw is a slender crosscut saw having a reinforced
back to supply rigidity. It is generally a crosscut saw, 10 to 20 inches in
length and with 10 to 14 teeth to the inch. For short, accurate cuts, like in
mitring, it is the best tool to use.
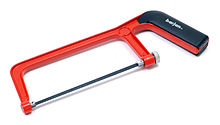
The Hacksaw
The hacksaw is a fine-toothed saw utilized for cutting
metals. You'll find it valuable in your home workshop when you need to shorten
a screw or bolt, when you should cut off or through a nail, and when a piece of
pipe or hardware must be made to fit.
The compass, or keyhole, saw bears a narrow, tapered blade
in order for it to fit into narrow spaces. Some types come with three or four
alternative blades that can be replaced to meet the demands of the particular
cut: there could be ripsaw blades and blades for crosscut work. Due to its
flexibility, the compass saw is especially useful for cutting along curved
lines. This saw is also frequently used for short cuts, or to finish off a long
cut and for fine irregular sawing.
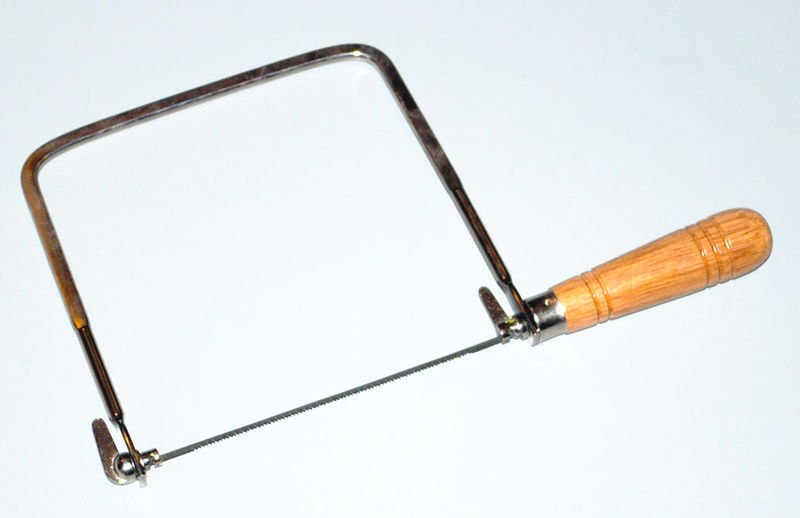
The coping saw is a small tool, a saw blade carried in a
steel frame. It is occasionally called a jig saw. The blade can be removed and
can range in thickness from a threadlike wire to 1/8-inch. width. The blade is
thus fragile and must be used only on thin wood. When an interior cut must be
made, a hole is bored, and the blade is threaded through the hole and then
connected to the frame. On the frame are pawls with slots where the blade fits.
Typically the blade can turn inside the frame. Blades may be flat or spiral:
the spiral blade has the advantage of being able to cut in whatever direction
without turning. For vise work, the
teeth of the coping saw must point toward the handle, but on work held by a saw
horse, it is best to have the points turned away from the handle.
Ripsaws, utilized for cutting along the grain of the wood,
will encounter less resistance and thus have bigger and fewer teeth than the
crosscut—typically from 5 1/2 to 6 points to the inch. The teeth are slanted at
almost 90 degrees so that wood fibers could be ripped as well as cut. For
cutting thick stock, a coarser tooth is needed—for thin stock, a fine tooth.
Because every tooth rips, no bevel is needed on the edge of the tooth, as it is
on the crosscut saw. Carpenters liken the ripsaw with a row of chisels pushing
forwards.
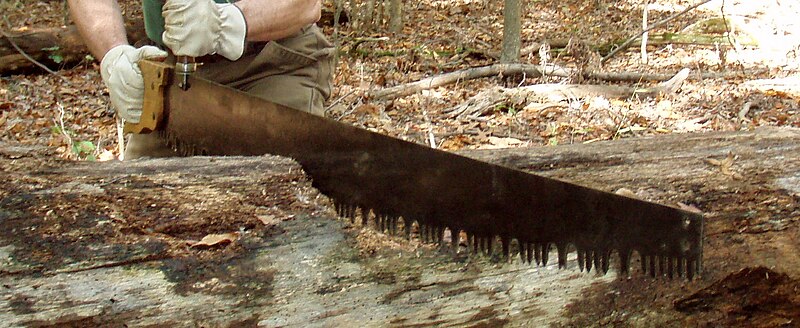
The crosscut saw is made for cutting across the grain of the
wood. Its teeth are little knives set parallel, far apart enough to hold back
the saw from binding. The crosscut saw does 25 per cent of its cutting on the
upstroke and 75 per cent on the down stroke.
A saw with coarse teeth cuts quicker than one with close teeth, and it
is particularly suited for thick boards, since it doesn't clog as easily. A blade having 7 to 8 points to the inch is
acceptable for most home work. But if fine work or joinery must be done, 10
points an inch would do a finer job. The number of points is normally stamped
on the heel of the blade. Small, fine-tooth crosscut saws, called panel saws,
are used for exceedingly fine work. Blade lengths range from 20 to 28 inches,
but for home carpentry a 26-inch blade would be the most satisfactory, unless a
major project is to be attempted.
There are different measuring tools. The ones you will need to use will depend on the size and the nature of the work or project you take on. A bigger job may require a 50- or a 100-foot steel
tape is needed, but for most tasks, a 6, or up to a 12-foot tape rule
will do the job. Most measuring tapes have a ring or hook attached to the tip to make it
latch at the point from which the measurement is taken. When this is not secure, tack or nail it onto the spot so that the tape does not slip and give you an erroneous measurement.