Prior to hiring a mover, acquire written details of the
insurance coverage offered by the moving company. Likewise check the length of
time you have to file the insurance claim. When you're already fussed out on
the moving day, a few damages may escape your attention. 90 days is the
standard length of time for filing an insurance claim.
Also verify if your homeowner’s insurance will cover the
move. If you have anything especially valuable—such as a priceless antique or a
one-of-a-kind art piece—you must ask about special coverage.
The movers would give you with an enumerated waybill after
loading the truck. It’s a good idea to have your own list, which includes
details of the number of boxes taken from each room and every item not bundled
in a carton. Then you can countercheck your list with theirs. Your personal
list is a great way to safeguard your belongings.
Why Guaranteed Delivery is Worth the Expense
If you must get your items picked up and delivered on
specific dates, spend for a guaranteed delivery. This actually does not
guarantee your delivery, but it obliges the mover to pay a fine—averaging from
$125 per day—plus expenses for you to stay in an inn if the date specified in
the contract is not met.
When you have decided that you are to move to a new
location, you may be contemplating if you will do it yourself or hire
professional movers to lift and transport all your worldly possessions. It is
undeniable that you will have less expense if you handle the move with some
help from relatives and friends. You may spend less than $200 if you rent a
moving truck and do the loading yourself. Compare that versus typical fees
professional movers charge: A local move involving a couple of miles may cost
around $200 to $300. A long-distance move, which needs the service of
international movers may cost $500 and up. Factors such as the quantity and
kind of furniture, the number of stairways the movers should manage at your new
home, and other matters could affect costs. If you own a grand piano, you
should get professional piano movers for this task.
If you are moving to a nearby location, you may choose a
smaller, local firm. Smaller moving companies might quote lower rates than the
bigger moving companies bearing nationwide distinguished names.
Although you choose to hire a professional mover, there are
ways in which you could still save money by packing and unpacking the items
yourself. Just be sure to initially check with the moving company. Some moving
companies give out do-it-yourself packing guidelines, which could specify the
type of packing materials that should be used. Some may define certain rules
for packing that needs to be followed before the moving company will take on
liability for damages.
Flowers you have picked from your garden or from a bouquet you have received may be dried and pressed to create pretty items to give as presents, tokens, or simply to make your home look nicer. The moment after they're in full bloom is the period to gather the petals, leaves, and twigs. You may preserve them and fetch them out as dried materials until you are prepared for your dried flower craft projects.
What flowers are ideal for pressing?
Rose petals, holly leaves, chrysanthemums, Johnny-jump-ups, an variety of multicolored leaves, twigs, blades of grass, and some lobelia blooms are just a few of the suggested ones to use. Geranium buds and leaves and the rest of tall-growing plants should be gathered in autumn. Some fernlike plants in your garden could be used for decorating Christmas cards.
How to Press Flowers
The easiest way to press flowers is still the traditional way. Simply lay the materials on a piece of paper towel, cover with another piece, and place it in between heavy books. Pile additional books on top, or use bricks to weigh it down then leave it undisturbed for a week. This way, long before you need them you already have a bountiful supply of dried and pressed garden blooms once you're set to do some crafting. Pressing flower is a fantastic way to delight the yields of the garden two times over.
Here are some pointers on how to avoid or at least lessen
the risk of becoming a car theft victim:
Find a Good Car Lock System
The cheapest hindrance to car theft is to lock your car and
remove the keys. Leaving the keys inside the car, especially in conspicuous
places such as the dashboard, invites danger.
A better option is having a plastic duplicate of your key set built into
a credit card-size plastic sheet that fits in your pocketbook. These duplicate
keys can be bought from car parts stores available for various car makes.
Set Up A Car Alarm System
There are numerous types of electronic car alarm systems or
a combination of alarms/fuel starvation systems. Generally, the systems could cost around $150
to $300. The alarm systems function by disabling the car or sounding an
alarm-or both-when the driver's door is unlocked and an override button is not
triggered. The override is concealed from the thief's vision. These systems are
effective, but only if you remember to set the alarm as you leave your car.
(And you should not forget to set the switch when you return inside the car, or
you will activate the ear-piercing warning signal.) To get proper security,
you'll have to place a detector on each door, not only the driver's door. That
would cost additional expense.
Car alarm systems may sometimes come at a discounted price,
so shop for the best bargain. To get the most savings, you may even install the
system yourself, but do this only when you are reasonably experienced in
dealing with the mechanics of the car. You can also purchase through mail-order
ads in reputable car magazines or buy your car alarm systems online. At the
least, acquire a system that activates your car horn (or a very loud warning
signal) and flashes your headlights. There are alarms are barely audible in
heavy traffic.
Cheaper alternatives to alarms are steel bar locks that
fasten onto your steering wheel and occasionally the brake pedal. The car won't
move until the bar is unlatched or drilled free. These will not stop car nappers,
but it'll slow them down.
Avoid Flamboyant Accessories
Occasionally car accessories, and not the car itself, are
the objects of theft. The high end sound system, for example, is a favorite; so
are the detachable roof parts on T-roof cars. Faux radio fronts can be bought
to cloak a high-priced model. High-performance tires and aluminum-alloy wheels
are also often stolen-keep them fastened securely on with key-locking lug nuts,
available at auto parts stores. Do not buy a car having flashy accessories if
you will be regularly parking in unsecured or a high-crime location.
Car maintenance must not be disregarded by car owners. A lot of money, energy, and time can be saved
just by being aware of certain techniques that can extend the usage duration of
your automobile.
Frequent oil change
It is always beneficial to frequently change the car oil and
oil filter. Cab and rent-a-car owners change both every 3,000 to 4,000 miles of
use. For regular city use, it is
recommended to change oil every 7,500
miles and change oil filter every 15,000 miles.
If you are confident enough and have the right tools, you
may do the work yourself and thus save money.
Changing the oil and filter will take only around 15 minutes if you're
used to it. If you double the frequency of oil changes over the initial 100,000
miles, you may spend about $100 more, but your engine will last years longer
than expected. The option is an engine rebuild, which might cost $1,200 or
more, or just buy a new car. If your chassis requires grease lubrication, do it
together with every oil change.
Tire Maintenance
Buy a tire gauge and an air pump. Tire pressure needs to be
checked every month and add air when needed. Properly inflated tires could last
twice longer than under-inflated ones. If you rotate tires, keep radials on the
similar side as you go from front to back.
Front tires of cars with front-wheel drive wear out faster than the back
tires. Some tire dealers will rotate tires free of charge for their tire buyers
which would save you $22 to $35 annually.
DIY Preventive Maintenance
Some auto parts just wear out. Be aware which ones would, and the expected
time they're likely to so that you can change the component before your auto
breaks down. Doing this will save a $60 to $80 towing expense, you could choose
the auto-mechanic of your choice, and you could even purchase the auto part at
a discount price.
Bring Spare Parts
If you're planning to have a road trip vacation, take some
spare parts along: a headlight, fuses, accessory drive belt, antifreeze, tube
patch (for hoses), and a spare tire. If your car goes with just an irregular
spare, consider acquiring a used tire of similar size and kind from a salvage
yard, but make certain it would fit in your car's spare tire compartment. Also
bring jumper cables, to save you the need to phone an expensive service truck.
Carpet flooring is an investment that will last for many
years. Besides being decorative, it offers sound and heat insulation plus it
increases the resale value of a residence. Be acquainted with the carpet style
you're planning to buy. Inquire about workmanship, appearance, retention,
strength, twist, and density. Since artificial light can dull some colors, take
home samples and view them in your room to see how they appear in both daylight
and lamplight.
Carpet Prices
Carpet prices are set per square yard, more high-priced
carpets are denser, better constructed, and available in more designs and
weaves. The texture and kind of fiber you select determines how your investment
endures. The more springy the fiber, the better the carpet will appear over
time. Look for tightly twisted threads and a pile compact enough to make it
tough to uncover the backing.
Nylon Carpet
Nylon is the sturdiest synthetic fiber as well as the most
popular material for carpets. It has
excellent color retention, volume, and softness. Most nylon combinations are
easy to clean; some newer brands are treated to be especially dirt and stain
resistant.
Polyester Carpet
This type of carpet has good feel, dyes easily, is
non-allergenic, and is reasonably durable. It is inferior to nylon in matting
and stain resistance.
Acrylic Carpet
Resembling wool material, acrylic carpets are crush
resistant and soft, but other combinations pill with wear.
Olefins/Polypropylene Carpet
This type of carpet is colorfast, strong, and
longer-lasting. Most indoor-outdoor carpets are constructed from
olefins/polypropylene.
Wool Carpeting
Wool has a warm, natural appearance and feel. It's also very
durable and fire resistant. However, its colors are generally not as vivid as
the synthetics, yet this classic is still the most expensive.
Carpet Budget
Evaluate your carpet budget, then purchase the finest
quality you can afford. Don't scrimp on high-traffic areas; fast wear out can
render it uneconomical. Make certain that the price on wall-to-wall carpeting
includes carpet installation and cushioning. Also find out who will do the job
and how it is guaranteed. Installation fees do not vary much; it should be the
carpet itself you must invest in.
A growing number of people are beginning to enjoy staying at home. In the first, place, it's a place where you find comfort. However, even staying home can be costly especially if your appliances and furnishings are of inferior quality, waste a lot of energy, or simply unfit for your lifestyle.
It is possible to furnish your residence in your own stylish way without overspending. Whenever you go shopping for furniture ask yourself, "Is it suitable for your home in size and style? Is it sufficiently versatile to be used somewhere else in the future? Is the price competitive compared with like items? Will it last as long as it should? Find out further on shopping smart, saving money, and getting the most from your appliances and furniture.
Ideal Shopping Seasons
Unlike appliances, home furnishings still maintain the usual December-to-February and June-to-September sale seasons. During these sale months, they drop the prices of beddings, mattresses, furniture, lamps, and rugs at furniture stores and showrooms. Naturally, the experienced shopper could find marked-down merchandise at any time of the year at clearance centers, which are managed by major furniture and department stores. Many would require cash payment and the purchased furniture is for pick up on (delivery may often be arranged for a certain fee).
Price is not All
Don't rely on price alone when evaluating a piece of furniture. Read labels and inquire about features you couldn't see. Don't immediately shun nice veneered construction (a layer of one wood bound to a lesser-quality base). Although it is termed as veneer, it does not imply it's inferior. The layered structure is actually stronger than solid wood, which can warp or break.
Shop for the Future
If you can only afford one furniture, select one that's sufficiently versatile to be used for a long time. Invest in quality furniture for the rooms where you will spend a lot of your time. Get the best couch you can afford, even if you sacrifice some budget for other frills. Place function and comfort foremost and you'll find out that aesthetic lines and symmetries need not be top-of-the-line. All the same, like in building a classic wardrobe, the smart shopper purchases a few fine pieces that will endure rather than selecting cheaper but badly made and ill-designed items.
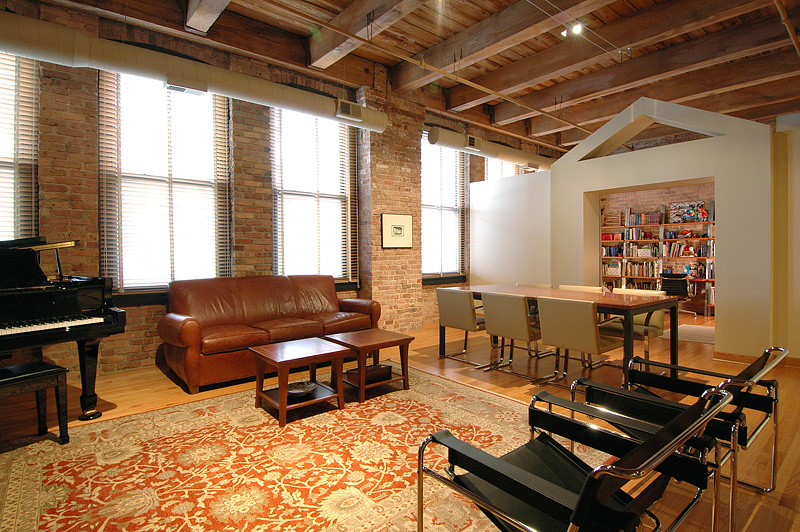
Residential styles of living have diversified greatly during the decades. Similarly, lofts have undergone tremendous transformations in function as well. From being industrial edifices, these structure have been developed into the most fashionable habitats of free-spirited and modern suburbanites, artists, skilled home entrepreneurs, or simply any person or family in need of a larger living space.
Residences in well renovated old buildings are sought after by many suburban residents now. The growing need for loft residences, give building contractors and real estate investors opportunities to profit from this trend. The attractions of a loft home include uncovered brick walls, high ceilings, large space, and architectural details. To add to the comfort, no outdoor gardening and lawn mowing skills are needed in loft living.
Numerous beautiful residential lofts nowadays were previously old factories. Today, the first impressions of lofts are of space, brightness, and comfort.
Loft space allows you to combine different furniture styles. A modern, overstuffed, single-color couch can blend with a lacquered table, an antique drawer, or an old chest. A wooden armoire can stand-in as a closet. Add warmth to concrete floors with hemp mats. On the ceiling, expose metal pipes to put emphasis on the contemporary industrial look; extend this industrial motif to the kitchen area using stainless steel and brushed aluminum accents on sinks, appliances, furniture and kitchen accessories.
Loft buyers love the concept of openness with no walls and no doors (except for the bathrooms!) type of home home. Furniture can be huge and comfy to pair up with a few striking modern art pieces.
Rent a loft if you think you like to give loft living a try. You may also redesign your home to create a lofty look.
• Use only simple yet functional window treatments. Bamboo blinds, wooden horizontal blinds, or customized Roman blinds are great for this intention.
• Putting up open kitchen shelves is an easy yet smart way to showcase your china collection and beloved pieces.
• Put up a large shower stall in place of your bathtub area to create an illusion of a larger floor space. Set a two-thirds wall of glass instead of using a shower curtain as a division of the shower from the rest of the bath to keep the visually open look of the bath area.
Acquiring a used car can possibly be cheaper, because a car greatly loses some of its value even within the initial year of ownership. It continues to lose its value in the years that follow. For similar model of used cars, the highest is price paid for a new-car dealer of the same car model, a smaller price to a new-car dealer of a different make, still lower price to a used-car dealer, and the smallest price to a private owner. But be aware that you only get the best deal if the car has good mechanisms and body. Here are tips on checkin a used car you wish to buy.
Smart Buying
After meticulous inspection when you have found a used car that you wish to buy, ask for the name and contact specifics of the prior owner. This won't be an issue if the used car is for sale by the owner. Contact the car owner to inquire of several details: mileage when the vehicle was traded, frequency of oil change, other car issues encountered. Do not buy it if the name and contact can't be provided. It possibly came from an auto auction, where rental companies and car dealers ordinarily customarilysend their problem autos, together with some decentdecent ones. Be firm on taking the car from the car lot to your trusted car mechanic for a diagnosis, safety inspection, and engine compression check. If this is not amenable to them, don't get the deal.
Checking the Mechanicals
When you're intending to buy a used car, dress comfortably because there's work to be done. Thoroughly check a used car before you even think of making an offer.
- Always insist to have a test drive. Go to the car; don't let the car salesperson bring it to you. Check under the car where it was parked. Check for leak spots under the engine? These may pertain to oil leak, transmission leaks or brake problems.
- Put th full weight of your body on every corner of the car and then release. More that two bounces of the car means it may need new shock absorbers.
- When the car is still cool, touch the inside of the exhaust. If you get an oily, black substance, this may implya valve or valve-seal issue. Ask the salesperson to start the car then stand back to inspect the exhaust. If smoke is blown, it may necessitate expensive repairs.
- Drive the car in regular conditions: on the side streets and highways, in slow-moving traffic, and at top speeds.
- Step hard on the brakes on speed. If the car pulls to one side, it may need costly brake rebuilding. If it takes a lot longer to halt on the second or third stop, the brakes may require new linings.
- Park the car and allow it idle for at least 10 minutes while the air conditioner is running so the engine doesn't overheat. Test the heater, radio, and wipers. Don't rush.
- While the parking brake is on and the car in drive, attempt to accelerate. The engine must stall or somewhat stall. If the car runs immediatelt, the brake might need repairs. In an automatic transmission car, failure to halt or stumble may indicate transmission problem.
Home finishing is the last step in constructing or
reconstructing a home. It also
represents a big bulk of the construction expense. Here are tips to save money when you're at the
finishing stage of your home constructing.
DIY Finishing
Although you would not wish to take on the responsibility of
being your home's contractor, you can still save on your home building
expenses. If you have adequate do-it-yourself know how, you can slash thousands
off your total bill by taking in some of the finishing tasks on your new home.
What you finish depends upon your skill level the amount of time you can
commit. The savings may be considerably worth it: You can save on labor costs
if you can do them instead of paying a professional contractor.
Talk to Your Contractor
Nearly all building contractors are willing to negotiate to
permit a few or most of the home finishing to be handled the owner. Regardless
of the amount of work you choose to finish yourself. It's recommended that you
let the contractor and his workers to finish their task before you assume the
rest of the task. This is also for your own safety.
DIY Drywall
You'll be able to save a considerable amount of money if you
can perform drywall work. You will require assistance hanging the drywall, but
that demands more strength instead of skill. After which, you may then hire a
professional to do the more meticulous finishing tasks or opt to do it yourself
if your experience is adequate enough.
Tips on Hiring a Contractor
If you have chosen to hire a finishing contractor, follow
these tips before you close the deal:
-Hire a contractor who is accredited in your location.
Affiliation with professional builder groups is a good sign.
-Check previous projects that the contractor has complete.
Is the quality good? Does it meet your standards?
-Be sure the contractor gets all required permits.
Basically, a building permit is prerequisite before starting structural
work. Remember that the person who gets
the permit is accountable if the work does not abide by prescribed building
codes and regulations.
-Make sure your prospective contractor is amenable to your
completing the rest or a portion of the work yourself, if that's what you are
planning. Some contractors refuse job contracts that involve subcontracting all
or a portion of the work to the homeowner.
To impart your feet extra insulation from the cold, line
your boots or rubbers with carpet scraps. Trace your foot on a piece of paper
to create a pattern and use the outline to cut the carpeting to fit. This also
works well for kids’ snow boots.
Recycle Ashtrays
As fewer people smoke these days, what do you do with all
your ashtrays? Use a few as spoonrests in the kitchen. Keep one on the kitchen
windowsill to hold rings when you're washing dishes. Put one in the bathroom as
a soap dish. Others come in handy under plants and in floral arrangements.
Recycle Fancy Doilies
If you have those old-fashioned lace doilies once popular
for protecting the backs and arms of good chairs, you could take them out of
storage and use them as lovely placemats and table runners. You can use them
alone, or with a plastic, solid-colored mat or cloth underneath to protect your
table.
Recycle Soap Chips
Here is a way to use every shred of soap—the bits we save
and never know what to do with. Take a square of nylon netting, put a handful
of soap slivers in the center, fold the netting up so there are a few layers of
net around the slivers, tuck in the ends like a package and sew all around the
edges using heavy thread. It is great for scrubbing collar stains or cleaning
hands after gardening or painting.
Having unique, elegant but no-nonsense interior decor demands some research. Interior design ideas from home and garden books are great sources. But make sure to combine your own unique style in your interior decor.
Create a stylish impression by leaving some reading items such as Architectural Digest and travel magazines lounging on the center table. Books about musicians or history are also good to have around.
Naturally, if you are love traveling, your house will be decked with mementos brought home from the foreign places you have visited. If you picture your home being filmed for a TV program or a featured on a magazine, you would fancy showing a hint of your personal statement, and exhibit glimpses of your elegant taste. Your home may reveal your interests,hobbies, wide range of culture (books are a lot more than ornaments) and fashion sense.
Most importantly, your decor should display an eye for color. Aim to make your home as exceptional as your personality, functional and stylish enough for a magazine, yet as cozy as a much loved pair of slippers.
Show that you have excellent taste, good feng shui, and pleasant house-warming soirees. Select a motif or a theme and apply it throughout the house; this does not have to be rigid, but should reveal your personality. Allow the personality of the house to also have an expression in the decor. Mix old with present, antiques with junk, but over all keep it innovative.
Ideally decorate before you move in, if not, at least decide on the specifics before you encounter the moving-day stress. Figure out what will be the feature of the room, and work around it. Mirrors make a room look bigger, dark colors on the ceiling make the room look smaller.
Decorate with picture frames and determine where the TV, the lazy boy and the bed go, and set up the rest around these.
Add antique clock if you can afford it; the tick-tock resembles a heart beat, and, once you get used to it, it will stop annoying you and it will make your home feel restful. If not, bring in a piano, or an instrument, but be considerate to your neighbors.
Moving home is the time to be rigid and also have a sentimental spring clean. Eliminate old clutter. But never forget that you are not a robot, nor should you reside in a aseptic environment. A squishy chair you can curl up on is indispensable. Your home should be inviting, but not too inviting: people who won't leave can be draining on a host or hostess. The balance you are going for is: 10 per cent mood; 10 per cent personality; 20 per cent comfort and 50 per cent flair.
Make your place clean, yet comfortable; you can admire display homes, but you must not live in such a place. The key is having a home that is livable.
Decorating small rooms call for a lot of creative and
practical thinking. It can be really challenging to create delightful corners
and crannies that are totally unexpected when you chance upon them.
The Kitchen
When you have a modest space in your kitchen or dining area,
turn it into a pretty spot by using just some accessories. For example, frame
two or three herb prints or a poster as wall decor. Then place a shelf below
the framed prints to carry small pots of blossoms or fresh herbs. This could turn into a tiny indoor garden for
snipping off a pinch of basil, parsley, or oregano when you need it.
A Pretty Laundry Room
Convert your laundry area into a terrific garden room. Start
by using a piece of textile you love and use it to make a customized valance
for the laundry room window. Stencil flowers designs that seemingly grows up
the wall beneath the window. A stenciled ivy vine pattern would also look nice
to decorate outside of the window frame. Position real topiary trees on any
side of the window. This cheerful makes one feel good about doing laundry more
often.
Artsy Powder Rooms
Powder rooms can be turn into art galleries. Use a framed
art piece to cover an ample portion of the wall. A framed funny postcard can
also add a touch of cheerfulness. Place small interesting items on your shelf
that might delight guests who use this room. You may use a simple window
treatment: The valance can be fabricated just by setting up lace-edged linen
napkins set on the diagonal tension rod. No sewing required. The bottom drapery
can be cafe style, covering only the lower half of the window.
Curtains make nice window treatments to a rather bare room. You can draw a curtain, drape fabric to make a curtain, buy a ready-made curtain and then, if you have exhausted all the ready-made choices, you can just make your own curtain.
Before measuring, decide on the drop and what type of rail you would like to have, since this will affect the width gathered, the length and so on. Then evaluate the coverage. Usually for pulleys- and rod-operated curtains you should add an extra 8—10cm on every side for the operation, and say a generous 15-20cm beyond the frame for all the hooks, rail, etc. Next, measure the correct height and width. Measure the frame but don't forget the extras you will need to total your calculations.
Purchase or borrow a sewing machine, collect swatches and decide on a pattern of style to be attempted. There are lots of great sources of inspiration. If you're new to this, go for something simple, and remember there's a lot to be said on the benefits of bohemianly draped swathes of raw cut cloth. Make sure your curtain fabric is weighty enough for the style intended.
When you bring the fabric home, and wash it following the provided washing instructions, load it into the machine to soften it up. Then meticulously, following your pattern, start to cut as directed.
Pin, tack, hem and then you are ready to machine together. Don't forget to line the curtains. This makes them look far more generous, if not the object of the method will be defeated, as light from the outside will still pour in. Thread through or attach hooks, then attach to curtain rod above the window and let them hang.
The home heating system requires periodic tune-ups to keep it efficiently working. Similar is true with boilers, furnaces, and heat pumps. Having your heater maintained by a professional heater technician annually or every two years save you a lot of money on your energy bill. All the same, it does not mean you could disregard routine maintenance. Here are some suggested DIY heater maintenance tips for you to follow:
Recreational vehicles or RVs are the more popular camping
cars. These cars are equal to traveling homes or motor homes. Several camping
cars and trailer towing vans are combined under the same label - RVs. The recreational
vehicles can be utilized for many purposes, such as getting across longer
distances, camping or sometimes just as a permanent home.
The biggest and most deluxe recreational vehicles are the
Class A Motor homes. The smaller variants are put under class B campervans.
Class C recreational vehicles are the more modest sized Motor homes. Other than
these, the camping cars are also assembled by combining the van with a trailer.
Altogether these recreational vehicles are configured to provide space for storage
and accommodation place.
A recreational vehicle consists of a bed, a small kitchen
area, table, a TV and storage space,
Larger recreational vehicles from Class A comprise of a shower,
bathroom, toilets, living room and
master bedrooms. These deluxe high end camping cars also have refrigerator,
satellite TV, internet facility, awnings, slide out compartments and storage
space for a car, motorbike or bicycle. The Class A camping cars are genuinely
luxurious vehicles. These are generally built on a truck or commercial bus
chassis for a larger space.
The recreational vehicles could be parked in a camping space
or in the special RV parks. It is really easy to carry the RV to a national
park, where staying on can be made comfortable with the vehicle. There's no
demand to book a room at a hotel while traveling in a camping car. One can cook
food in the kitchen, hence no need to locate a restaurant on the way. The RVs
also demonstrate to be a good shelter for the travelers.
Like any vehicle, it is wise to have your RV insured with a
reputable company such as Good
Sam RV Insurance that offers comprehensive insurance plans
specifically designed for recreational vehicles.
The quality of your reception chairs in the office will
reflect that old saying "you only get one chance make a good
impression". Inside your office,
you will want to be sure that guests and clients are as comfortable as they can
be when they wait for an appointment.
Reception chairs are popular outside of the office also, as schools and
even churches use them.
Office reception chairs are really good assets to have
around, as they'll provide a friendly aura and leave a long lasting effect on
your guests. By utilizing these reception
area chairs in your office, guests should feel cozy and right at home in your
abode. You could also place your chairs
around a desk or coffee table in the waiting room with a heap of magazines for
your guests to read.
While shopping for reception chairs, among the most
important decisions will be finding chairs that will make individuals of all
height and weight comfortable.
What you will want to do, is supply office chairs that offer
adjustable choices for the height, depth of the backrest, and even the arm
rests. The ordinary reception chair is
very durable and can last up to 15 years - with every guest along the way being
comfy and each and every time they sit in the chair.
Nearly all reception chairs have a strong and stable frame
that will give your back the utmost amount of ergonomic benefits. You can even get your chairs with other
options as well, including leather, vinyl, or fabric. You can also choose the colors and padding
for the seats.
If you have an office that has a waiting room, you should
not hesitate to add reception chairs.
These chairs will offer the "home away home" feeling, and give
your office the look and feel your clients will love to come back to.
Windows can pose a decorating dilemma. Most of the day, you will want your windown unobstructed so that plenty of light can enter a room. But at night you would'nt like to see those unattractive window frame. Light is an essential decorating element. There's nothing better than natural light. When planning your room lighting, you should understand the different possibilities and how to achieve them, either naturally or artificially. The window placement should be considered when deciding on the type of curtain, shade, or how other window treatment could look best.
When you need to brighten up room or a hallway, a touch of yellow does a lot. The use of yellow to paint the interior of a closet gives you a welcome surprise every time you open your closet door. A pale shade of yellow looks very nice in a kitchen or baby's room. If your wallpaper has some yellow accents, consider using yellow on the trimmings of your window, door, and wall. Explore other areas in your home to find where you can add a yellow touch. You'll be amazed at how refreshing and delightful the result will be.
The level tool used in carpentry is typically made of wood, aluminum, or magnesium,
and is rectangular in shape, from 9 to 24 inches long. It may typically have one or more true surfaces
having a glass vial in the center of each surface. The glass vial right
in the center of a horizontal surface and parallel with it is used in
leveling; a glass vial in the end of a level, perpendicular to the true
surface, is used to check the plumb or vertical trueness.
To check whether a surface is level or plumb, put the level tool on the
surface to be leveled or plumbed, while holding the level with the hand.
When the position of the bubble isn’t in the center of the vial, the
surface is not level or plumb. The bubble always moves toward the higher
side...READ MORE>>>
Here are some tips on effectively cutting wood using a hand saw.
A circular cut on wood is typically created by boring a hole using a brace and bit or a drill, then expanding it using a compass or a coping saw or a saber saw. If much of this work must be done, like in cutting a straight cut through floors, it is a good idea to round the end of a crosscut saw, extending the teeth so they form a semicircle. This can be used to cut directly on the floor without drilling. A similar result can be obtained by bolting half a blade of a circular saw to the base of a steel strip or an old saw.
When the saw cut would be of limited depth, create a fence from two thin strips of wood a bit longer than the saw blade...READ MORE>>>
There is a seven-step sequence to weaving a cane seat. You
first lace the cane vertically, from rear seat rail to front seat rail. Second,
lace the cane horizontally. Third, weave the cane diagonally. Fourth, put down
a second vertical layer. Fifth, weave a second horizontal layer. Sixth, weave a
second diagonal layer. Seventh, lace binder cane over the holes. Tie off cane
ends beneath the rails as you go.
Before you begin recaning your chair, read the preparation instructions provided on the link below:
Step one: begin vertical strands of cane from center hole in
back rail to center hole in front rail. Count the holes to be sure. If there's
an even number of holes, start with a hole closest to the center. Push around 4
inches of cane through back center hole, and hold it using a wooden peg. Pull
the cane across and down through the front center hole, making sure the smooth
side of the cane faces up. Bring the end of the cane on the underside of the front
rail and up through the next hole. Then go across seat to the next hole in the
back rail and down through. Then over to the next hole, up through it, across
to the front rail, and down through the next hole there. Keep on lacing the
cane this way until half of the seat is covered. Then cover the other half the
same way. Never pull the cane too tight; it would shrink as it dries. Knot the
ends.
Step two: Lace the horizontal strands across from side rail
to side rail in the same manner. These strands lie on top of the vertical ones.
Step three: Weave the first diagonal strands, starting at
the right front corner, over horizontal strands and under vertical strands. To
maintain six-pointed star pattern, you may have to put two strands through the
same hole, due to the curvature of the side rails.
Step four: Lay a second course of vertical cane over the
work thus far, using the same holes as for the first course. This course isn't
woven in. Lay cane to the right of the original vertical strands.
Step five: Weave in a second course of horizontal strands,
using the same holes as the first course. These strands go below diagonal
course and first vertical course, and over second vertical course. Place them
to the rear of horizontal strands laid down in step two.
Step six: Weave in a second course of diagonal strands, this
time in the opposite direction from the first diagonal course. These weavers
always go under all horizontal and over all vertical strands, just the opposite
of the way in which diagonal strands were laid down in step three.
Step seven: Fasten the binder cane around the seat's
perimeter to cover the cane holes. Binder cane is ordinarily just cane that is
one size wider than the cane you use for weaving. Measure adequate length to go
around.
Push one end of the binder cane into the corner hole at the
right rear corner, and lay out the rest along the back edge of the cane. Choose
a long strand of weaving cane, and pull all but 4 inches through the hole next
to one where binder started out. Loop end of weaving cane around binder, and
pull it through the same hole, tying the binder down. Next, bring the long end
of the cane up through the next hole, over the binder, and back down through
the same hole. Keep on this with each hole until you have tied the binder down
the whole way around. Tuck the end of the binder into the same hole where you
started.
The marking gauge is designed to help you make accurate
lines parallel to the edge of a panel or board. A common wood gauge is about 8
inches long, with a scribing spur close to one end. A sliding head may be moved
through the body and clamped using a thumbscrew at any place. When choosing a
gauge, get one made from hardwood secured with a brass or metal head. A special
double-bar gauge with two spurs is designed for marking off a mortise. The
gauge is set once, and the spur on each side is used in turn to show the
mortise area.
For the job of boring holes on your woodwork project,
there's this wonderful tool called the brace and bit. When boring holes in
wood, a few turns would feed the bit into the wood without much pressure. To
drive screws, the pressure should be maintained. When working in corners or
other tight areas wherein a full turn of the crank is out of the question, a
ratchet mechanism is plied to ratchet the bit either to the right (to drive) or
to the left (to withdraw) just by turning the cam ring.
Holes are often bored at the wrong angle since the
woodworker may not be aware how uncomplicated it is to bore them perpendicular
to the pierced surface. The main problems that go with boring a hole are
getting it straight and not breaking rough the wood at the bottom of the hole.>>>READ MORE
Carpenters use different types of pencils: hard lead, common
lead,and the regular carpenter pencil. The most widely used type is the flat,
hard lead pencil -- 8 inches long.
Utilised in rough work, the pencil should be trimmed so that only 1/4 to
3/8 inch of lead protrudes from the wood sheath. In finished work, the pencil
must be trimmed so that 3/8 to 1/2 inch of lead is exposed and the lead tapered
to a long, flat point. During marking, the pencil should be angled away from
the guide so that the lead would mark near the edge of the guide. If the pencil
gets wet, the glue that holds it together may fail and render the pencil
useless.>>> READ MORE
When you anticipate doing any amount of mitring—that is,
sawing at an angle—a mitre box would be a big timesaver. Guides on the mitre
box can be conformed so that a backsaw will cut at whatever angle from 45 to 90
degrees to any desired depth. Care must be taken that the stock doesn't shift
while cutting, and that the saw doesn't either touch the front or pull out of
the rear guide. Matching pieces can be easily cut just by adjusting the length
rod. Frames from 4 to 12 sides can be cut by relating to the proper angle,
often pointed on the mitre box itself. In sawing, always begin on the outside
of a mark. A crosscut saw has a kerf of about 1/16 inch, and a rough edge would
require some added smoothing.
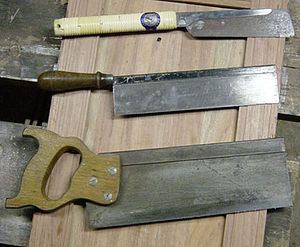
The backsaw is a slender crosscut saw having a reinforced
back to supply rigidity. It is generally a crosscut saw, 10 to 20 inches in
length and with 10 to 14 teeth to the inch. For short, accurate cuts, like in
mitring, it is the best tool to use.
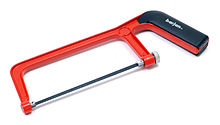
The Hacksaw
The hacksaw is a fine-toothed saw utilized for cutting
metals. You'll find it valuable in your home workshop when you need to shorten
a screw or bolt, when you should cut off or through a nail, and when a piece of
pipe or hardware must be made to fit.
The compass, or keyhole, saw bears a narrow, tapered blade
in order for it to fit into narrow spaces. Some types come with three or four
alternative blades that can be replaced to meet the demands of the particular
cut: there could be ripsaw blades and blades for crosscut work. Due to its
flexibility, the compass saw is especially useful for cutting along curved
lines. This saw is also frequently used for short cuts, or to finish off a long
cut and for fine irregular sawing.
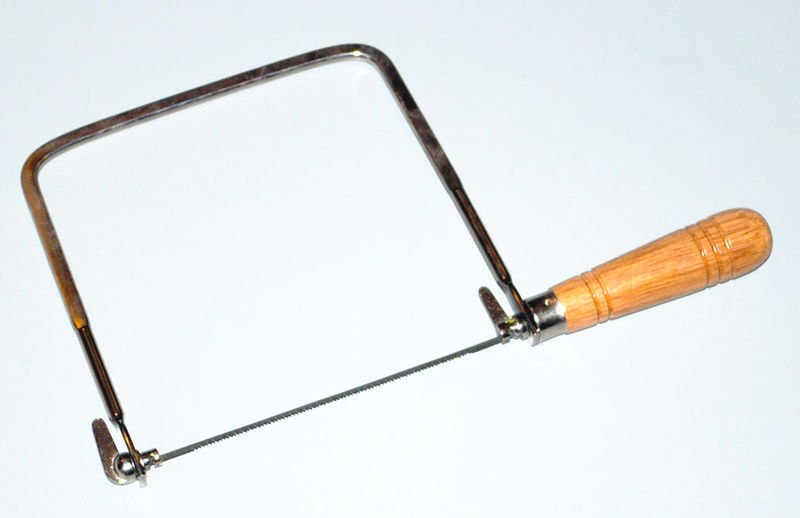
The coping saw is a small tool, a saw blade carried in a
steel frame. It is occasionally called a jig saw. The blade can be removed and
can range in thickness from a threadlike wire to 1/8-inch. width. The blade is
thus fragile and must be used only on thin wood. When an interior cut must be
made, a hole is bored, and the blade is threaded through the hole and then
connected to the frame. On the frame are pawls with slots where the blade fits.
Typically the blade can turn inside the frame. Blades may be flat or spiral:
the spiral blade has the advantage of being able to cut in whatever direction
without turning. For vise work, the
teeth of the coping saw must point toward the handle, but on work held by a saw
horse, it is best to have the points turned away from the handle.
Ripsaws, utilized for cutting along the grain of the wood,
will encounter less resistance and thus have bigger and fewer teeth than the
crosscut—typically from 5 1/2 to 6 points to the inch. The teeth are slanted at
almost 90 degrees so that wood fibers could be ripped as well as cut. For
cutting thick stock, a coarser tooth is needed—for thin stock, a fine tooth.
Because every tooth rips, no bevel is needed on the edge of the tooth, as it is
on the crosscut saw. Carpenters liken the ripsaw with a row of chisels pushing
forwards.
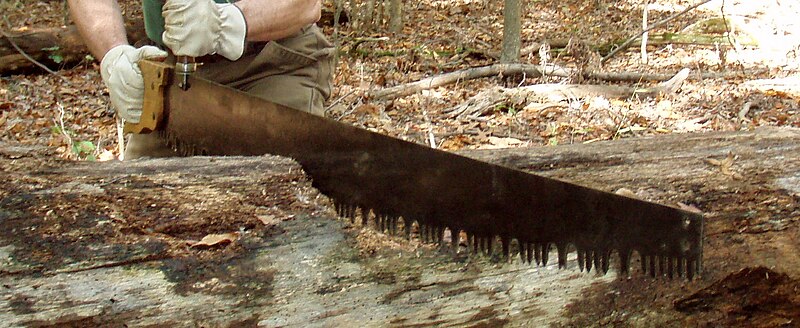
The crosscut saw is made for cutting across the grain of the
wood. Its teeth are little knives set parallel, far apart enough to hold back
the saw from binding. The crosscut saw does 25 per cent of its cutting on the
upstroke and 75 per cent on the down stroke.
A saw with coarse teeth cuts quicker than one with close teeth, and it
is particularly suited for thick boards, since it doesn't clog as easily. A blade having 7 to 8 points to the inch is
acceptable for most home work. But if fine work or joinery must be done, 10
points an inch would do a finer job. The number of points is normally stamped
on the heel of the blade. Small, fine-tooth crosscut saws, called panel saws,
are used for exceedingly fine work. Blade lengths range from 20 to 28 inches,
but for home carpentry a 26-inch blade would be the most satisfactory, unless a
major project is to be attempted.
There are different measuring tools. The ones you will need to use will depend on the size and the nature of the work or project you take on. A bigger job may require a 50- or a 100-foot steel
tape is needed, but for most tasks, a 6, or up to a 12-foot tape rule
will do the job. Most measuring tapes have a ring or hook attached to the tip to make it
latch at the point from which the measurement is taken. When this is not secure, tack or nail it onto the spot so that the tape does not slip and give you an erroneous measurement.
Each carpenter uses a Surform file or woodworker's file wood
and a regular file for work on his tools. But filing woodwork is usually not
regarded good practice. The Surform tool or file is employed to expand round
holes and also to finish curved work that has been sawed near to the line. To
the craftsman, this is permissible only when the work is exceedingly hard to
reach using a chisel or a spokeshave.
When working with the Surform tool or file, grasp it at the level of your
elbow. The handle must be held in the right hand on the fleshy part of the
palm, with the thumb leading on top. The
front end of the tool should be held using the thumb and first two fingers of
the left hand, with the thumb on top. These tools are designed to cut in only
one direction, so that pressure must be placed only on the forward stroke.
image via Wikipedia
All files should be worked using the handle, except when a
file is employed for jointing a saw. A lot of accidents happen when a file
without a handle encounters resistance and the tang pierces the handler's skin.
Handles are available in metal and wood and are normally removed when the file
is not being used. To put a small handle, insert the file with the handle on
the bench, hitting the point until the fit is firm. Be mindful not to strike
too hard, or the handle would split. To take out the handle, put the ferrule at
the edge of the bench so that the handle is over the bench and the file is
free; then tap the file against the bench.
image via Wikipedia
To create finishing cuts on long, narrow work, clutch the
tool at a right angle and move it to and fro. This is known as draw filing.
When filing a curve, use a sweeping movement diagonally
across the grain to avoid creating grooves and hollows in the work. This
likewise tends to avoid chipping both edges.
The teeth of a Surform tool are fragile and easily broken.
Careless wielding of files would dull them. The oil on a new file can be taken
away by covering it with chalk or charcoal prior to using.
Files will last a lot longer if they're cleaned with a file vard or brush each time they're used. This doesn't sharpen the file but would
restore its usefulness. A file used on
metal will soon go dull because of the gathering of filings. These can be
removed by dipping the file in a solution of sulphuric acid for five minutes,
then washing it in ammonia. The acid gnaws at the clogging fill and loosens
them enough to let them to fall out.
image via Wikipedia
The wood rasp is a rough-cut file designed for cutting wood,
has one flat side and one convex side, either of which closely toothed. One end is a tang that fits into a wood
handle. Surform tools have mostly replaced the rasp modern usage.
The rasp is utilized for cutting and dressing joints where a
plane cannot be used, and for dressing handles in handle fitting. Oil should
not be used on a rasp because it will cause the rasp to become congested with
wood particles.
Among the most valuable things you will know about tools is
to use a grindstone on every one of your screwdrivers. Strictly speaking, of
course, a screwdriver is not sharpened the least bit— it should be really dull.
In fact, you can encounter more grief using a screwdriver that is improperly
formed than with any other tool. If your screw driver ends are already rounded
in its edges you will witness tools that act like grasshoppers. Such a tool
could jump out of a screw, dig into the piece of fine-finished wood you are
working with, and may in fact, drive you utterly mad. Having a good
screwdriver, correctly shaped, you are able to easily drive home a screw that
matches it without much gamble of its slipping out of the slot and ruining your
work. Screwdrivers are ground on an emery wheel or grindstone to achieve their
right shape. The edge must be made straight across the end and the faces close
to the ends parallel or almost parallel to one another. This is needed to
prevent the screwdriver from slipping.